GET STARTED
Welcome to Tochie, your new personalized voice aide. With Tochie, you will be able to send custom voice and text-to-voice messages to help you or your loved ones stay organized and on-track with daily routines. Schedule one-time or recurring reminders for medications, appointments and care, or create your own custom reminders using the Tochie mobile app.
EASY SET UP
- Download and install the Tochie App
- Connect your Tochie device to your account
- Record and send your first message
HELPFUL TIPS
- Double tap your Tochie device to replay the last message
- Double tap your Tochie device to confirm a quick message
SCHEDULED EVENTS
How to schedule a new event
- In the Schedule tab, select the + icon either in the top right corner of the screen or below the list of events
- Choose the schedule type from the list
- Create a new reminder message or choose an existing one from the list
- Follow through the type-specific menu, filling each information field as needed
How to update an existing event
- Go to the Schedule tab
- Select item you wish to update
- Make the desired changes in the Edit Schedule menu
- When you are finished, save your changes with the Save option in the top right corner
How to skip an event
- In the Schedule tab, select the desired date from the calendar
- Find item you wish to skip
- Slide the item toward the right to reveal the Skip option
- Select the Skip
 icon to skip
Note: if this is a repeating event, only this occurrence will be skipped. The remaining will be played as scheduled.
How to undo a skipped event
- In the Schedule tab, select the desired date from the calendar
- Find skipped item you wish to undo
- Slide the item toward the right to reveal the Undo option
- Select the Undo
 icon to play event as scheduled
How to delete an event
You can delete a scheduled event in two ways from the Schedule tab
Delete from View By Day
- Select the item you wish to delete
- Select Delete Schedule & History at the bottom of the page
Delete from View All
- Select the item you wish to delete
- Slide the message toward the left to reveal options
- Select the Delete
 icon to delete
MESSAGES
How to delete a message
- Go to the Messages tab
- Find the message you wish to delete
- Slide the message toward the left to reveal options
- Select the Delete icon to delete
How to change message name
- Go to the Messages tab
- Find the message you wish to update
- Slide the message toward the left to reveal options
- Select the Edit
 icon
icon - Rename the message and select save
How to edit a message
- Go to the Messages tab
- Find the message you wish to update
- Slide the message toward the left to reveal options
- Select the Edit icon
- Rename the message and select save
How to change the message ringtone
- Go to the Messages tab
- Find the message you wish to update
- Select the Ringtone
 icon to the left of the message name
 - Choose the ringtone in the list to listen to a preview
- Select back to save the ringtone and return to the message screen
QUICK MESSAGES
What is a Quick Message?
A Quick Message is a real-time voice message that is sent to Tochie device(s) immediately after you have finished recording it. Quick Messages are not saved and will not be available for later playback.
How to send a Quick Message from my device
- Select the Quick Message
 icon in the lower right corner of the app
 - Select on which devices to play the message and whether a confirmation is required
- Tap the microphone to begin recording your message
- When finished with you message, tap the microphone to stop recording
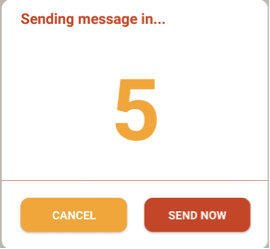
- The message will automatically be sent after five seconds, or you can send it immediately by tapping the SEND NOW button. You can stop sending the Quick Message by tapping the CANCEL button.
What is confirmation?
A confirmation is a Quick Message feature which allows you to know whether you message was received. When you create a new Quick Message, you have the option to require confirmation. Your message recipient can acknowledge the message and you will receive a push notification response. You can also check the confirmation status in the History tab of your Tochie app.
How to require confirmation for my Quick Message
- Select the Quick Message icon in the lower right corner of the app
- Toggle confirmation option to
 Confirmation Required
 - Record and send your Quick Message as usual
How to confirm that a Quick Message was received
- You will be prompted to confirm receipt once the message has played to completion
- Double tap your Tochie to confirm. A thank you message will play to indicate your confirmation has been successful
How to change confirmation settings
- Go to the Schedule tab
- Select the Settings
 icon in the top left corner
 - Scroll down to the Confirmation Settings section and make desired changes
TOCHIE DEVICE
How to change the prompt language on Tochie device
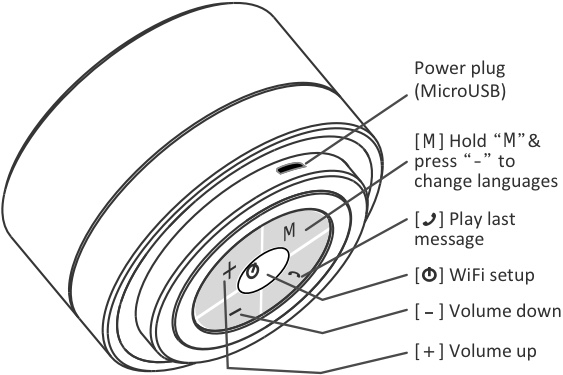
The WiFi-related prompt language is determined by the Tochie device. To change the language, press and hold the M button while clicking the – (volume down) button to scroll through the language menu. Stop on the desired language. The remaining prompt languages are determined by the message sender’s mobile device language.
How to adjust the volume of my Tochie device
The Tochie volume can be adjusted using the Volume buttons on the bottom of the physical device. It can also be adjusted through the Tochie app.
Adjusting volume through the Tochie app
- Go to the Schedule tab
- Select the Settings icon in the top left corner
- Select the device whose settings you wish to update
- Use the volume slider to adjust the volume on the device
- Once finished, click the Back Arrow
 to save and return to the main menu
How to update Tochie WiFi setting
- Go to the Schedule tab
- Select the Settings icon in the top left corner
- Under the Account Settings section, select Change WiFi option
- Follow the provided instructions to select the desired router and provide access credentials
- If you’re unable to connect to WiFi, please reset the power of your Tochie and redo the change WiFi process. If the issue persists, try restarting your mobile device and redoing the process again.