GET STARTED
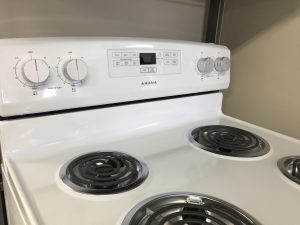
With Smarturns, you and your loved ones never have to worry about forgetting a running stove again. Get alerted if the stove is left on and unattended for an extended period of time through the Smarturns hub. Or remotely monitor the status of your stove using the Smarturns mobile app. Friendly reminder, Smarturns does not automatically shut off your stove. You will need to perform the shut off manually.
EASY SET UP
- Download and install the Smarturns app
- Install the Smarturns knobs on your stove and mount the motion sensor
- Connect the Smarturns gateway to your home Wi–Fi and your Smarturns account
- Monitor the status and activity of your stove
General
CAN SMARTURNS BE USED TO TURN OFF MY STOVE
Smarturns is a smart stove monitoring system. It cannot be used to turn off your stove. You will need to perform the shut off manually.
DO I NEED TO HAVE INTERNET ACCESS AND A MOBILE PHONE TO USE SMARTURNS
You do not need to have internet access and a mobile phone to use Smarturns. Without the internet or mobile phone, the Hub will work as an automatic, local alarm to alert the stove user when they are away from the stove for 5 minutes* (default timer). You can always contact technical support at support@tochtech.com to change the default timer. However, without internet access and a mobile phone you will not be able to monitor stove activity remotely.
WHAT HAPPENS IF THE INTERNET CONNECTION IS LOST
If the wireless connection to the internet fails, the Smarturns knobs and local hub alarm will continue to work. There is NO impact to the use of stove. However, while the internet connection is lost, new notification messages will not be sent to the mobile phone until the connection is re-established.
Smarturns App
HOW TO REARRANGE KNOBS ON STOVE SCREEN TO REFLECT STOVE POSITION
- In the Stove tab, tap and hold one knob. It will wiggle once it has been selected
- Drag to corresponding stove position
- Repeat with remaining knobs
HOW TO UPDATE ALARM SETTING
Your hub’s alarm settings can be changed in two places: the Stove tab and the Setting tab.
To get to the Alarm Settings menu from the Stove tab, simply select the Alarm icon in the top right corner
To get to the Alarm Settings menu from the Setting tab, first select the desired Smarturns profile listed under the My Smarturns section. Then select Alarm Settings option.
HOW TO CHANGE SMS MESSAGING SETTING
If you provide your mobile phone number, you will be able to receive text messages of your Smarturns alerts. Extra charges may be applied by your mobile network operator depending on your mobile plan.
The SMS Messaging settings can be found in the Setting tab. In this menu, you can toggle to enable/disable SMS messaging. If enabled, provide your mobile phone number. You may also select the type of alerts you wish to receive: Stove on/off and Stove Unattended. If the slider is blue, the option has been selected.
HOW TO ADD A NEW SMARTURNS TO YOUR ACCOUNT
- Go to the Home tab
- Select the + icon in the top right corner
- Follow the on-screen instructions
HOW TO INVITE OTHERS TO MONITOR YOUR SMARTURNS
- Go to the Setting tab
- Select the desired Smarturns profile (listed under the My Smarturns section) that you wish to share
- Select Invite to Monitor
- Select the + icon in the top right corner
- Enter the user’s Smarturns account email address. Your Smarturns will automatically be visible in their account
- If they do not have a Smarturns account, enter the email address they wish to use. They will be required to use that email address to register a new Smarturns account. Your Smarturns will then be visible in that account
HOW TO REMOVE USERS FROM MONITORING YOUR SMARTURNS
- Go to the Setting tab
- Select the desired Smarturns profile (listed under the My Smarturns section) that you wish to share
- Select Invite to Monitor
- Find the user you wish to remove then select the Trash icon beside their email address
HOW TO REMOVE MYSELF FROM MONITORING ANOTHER USER’S SMARTURNS
Currently, only the owner of the Smarturns is able to remove users from monitoring. You may, however, disable that Smarturns profile from your account. If disabled, you will not receive any notifications or unattended cooking alarms from this stove
- Go to the Setting tab
- Select the desired Smarturns profile (listed under the Other Smarturns section) that you wish to display/hide
- Toggle Display Stove on/off
- Blue slider indicates the stove will be displayed
- Grey slider indicates the stove will be hidden/disabled
HOW TO CHECK SYSTEM STATUS
The System Status menu allows you to check the health of your Smarturns system. Here you will be able to check the connection status of your hub, knobs and motion sensor. You will also be able to check the battery levels of your Smarturns knobs.
To get to the System Status menu:
- Go to the Setting tab
- Select the desired Smarturns profile listed under the My Smarturns section
- Choose the System Status option at the bottom of the page
WHAT DOES THE QUESTION MARK IN THE MIDDLE OF THE KNOB SIGN MEAN
In the Stove tab, a question mark in one of the stoves indicates that the knob associated with that burner is not communicating to the hub. During initial set-up, your Smarturns knobs may take a few minutes to connect. Clicking the questions mark will display the last status of the knob. Please check the battery information displayed. In most cases, the knob will reconnect after you turn on that burner. If it doesn’t, you may need to manually reset the connection, see here for guidance.
HOW TO VIEW USAGE OF A DIFFERENT STOVE
- Go to Usage tab
- Select the Menu option in the top left corner
- Select the Smarturns profile you wish to examine
HOW TO SET A TIMER
- If not on already, turn on the desired stove burner
- Tap to select that burner and bring up the timer settings
- Set timer duration as desired
- Select Set Timer button to start the timer
- Once the timer has finished, you will be notified on your mobile device
HOW TO UPDATE SMARTURNS PROFILE
- Go to the Setting tab
- Select the desired Smarturns profile listed under the My Smarturns section
- Select Smarturns Profile
- Update as desired then save changes with the Save button
Smarturns Knobs, PIR Detector, Hub
WHAT DO THE LIGHTS ON THE SMARTURNS HUB INDICATE
Blue light on: the hub is working properly and is connected to the network
Red light blinking: one or more of the connected Smarturns knobs is turned on
Blue light blinking: the hub is not connected to the network
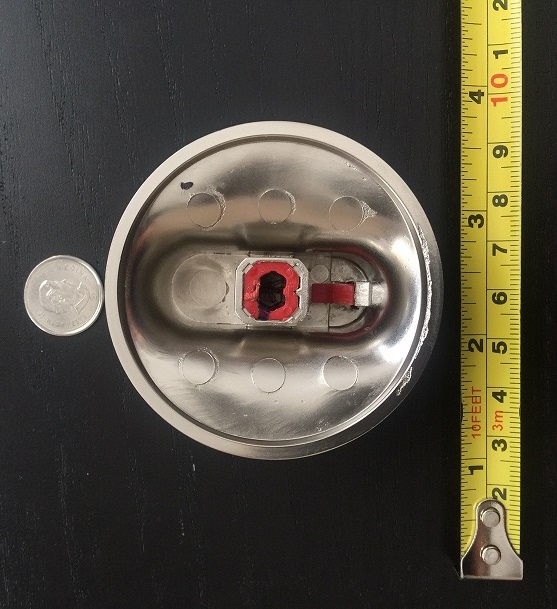
HOW TO CHANGE THE BATTERIES OF THE SMARTURNS KNOBS
- Use the provided reset pin to remove the two rubber inserts on the back of the knob
- Unscrew both screws to open up the knob
- Replace with a new CR2032 battery
- Put back the knob cap and screw to secure
- Put back the rubber inserts
Battery levels of each knob can be checked in the System Status menu of the Smarturns app
*For video demonstration of this, please visit: https://vimeo.com/250154380
HOW TO CHANGE THE BATTERIES OF THE PIR DETECTOR
- Use the provided reset pin to set the ON/OFF switch to “OFF”
- Open the lid of the motion sensor
- Replace batteries with 2 new AAA batteries
- Snap motion sensor lid closed
- Use the pin to set the ON/OFF switch “ON”
Batteries should be replaced every 5 to 6 months to ensure Smarturns function works properly.
* For video demonstration of this, please visit: https://vimeo.com/248898032
RESET CONNECTION BETWEEN KNOB AND HUB
- Press the button on the Smarturns hub once
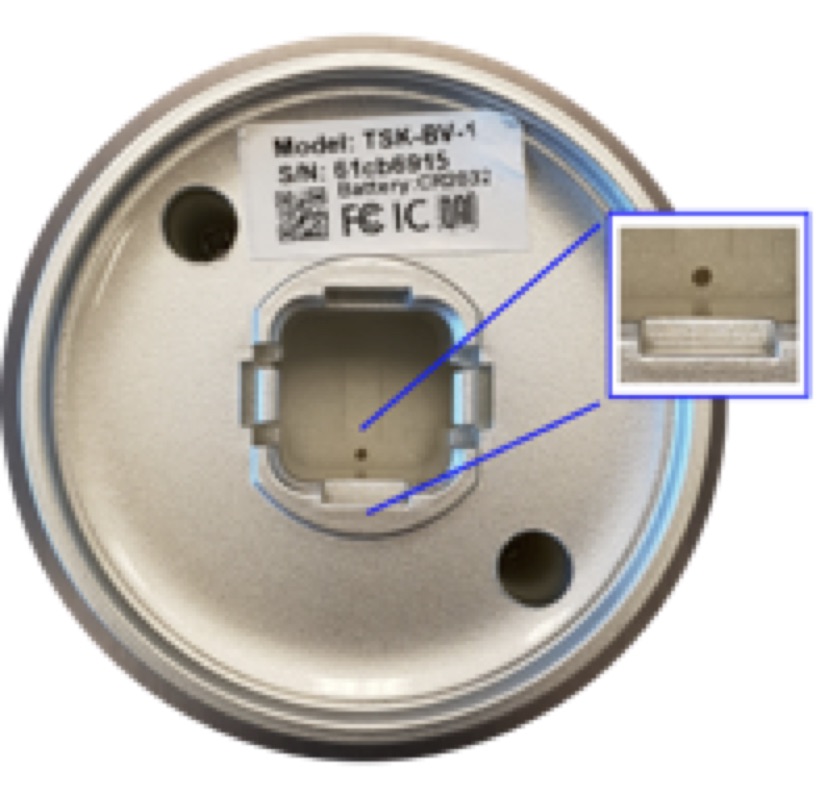
- Locate the small reset button on the back of the Smarturns knob (see diagram below)
- With the provided reset pin, push the button within the tiny hole. Hold the button down for 2-5 seconds and release
- The hub will beep twice to indicate the connection between the hub and knob has been re-established
RESET CONNECTION BETWEEN PIR DETECTOR AND HUB
- Press button on the hub once
- Turn motion sensor switch OFF and ON again
Hub will beep twice to indicate the connection has been reset successfully